What's New in Destiny 19.0
Including Automatic Updates for Versions 19.1, 19.2, and 19.3
Welcome to Destiny version 19.0, including the automatic updates for versions 19.1, 19.2, and 19.3. Destiny is a complete library and resource management system that can be accessed from anywhere, 24/7, helping to strengthen the bond between the library, classroom, and home.
This new version incorporates many of your suggestions, and we are confident the enhanced features and functions will meet your needs. We continue to improve Destiny for today’s students, teachers, and librarians.
Look for the following 19.3 features:
We know you will want to begin using these enhancements right away!
|
Notes:
- To update to the latest version of Destiny, you must be on Destiny v12.0 or later. If you have a version of Destiny earlier than v12.0, you must first update to Destiny v12.0 before you can update to v19.3.
- Some Destiny Discover features will not be completely visible until you upgrade to Destiny v19.3.
|
Following are descriptions of the new features in Destiny v19.0, including the automatic updates. Click a category to expand it, and then click a title for more information on each feature.
 All Destiny Products
19.3 Follett Destiny Back Office App
The updated version of the Follett Destiny Back Office app continues to provide staff users with a way to access Library Manager and Resource Manager circulation and inventory functions on mobile devices.
Use the app on your Follett Destiny VersaScan device, or on Android™ or iOS™ smartphones/tablets.
The app includes feature updates to:
-
Single Sign On (SSO with Destiny Back Office v19.3)
-
Circulation (Conduct offline; includes new sounds)
-
Patron Status
-
Item Status (Add copies/items)
-
Inventory (No longer just on VersaScan; conduct inventory offline; add items "on the go")
-
Scanning (With a camera on Android and iOS smartphones/tablets)
-
Transfer functionality (for Resource Manager)
-
Digital signatures (for Resource Manager)
| Important: The Follett Destiny Back Office app requires Destiny version 19.3, Android version 8, and iOS version 13 respectively. |
| Note: Whether you had the app before or not, you need to download the new version to your VersaScan hardware, Android, or iOS device. |
For more information, see Set Up and Use the Follett Destiny Back Office App.
19.3 Enriched Reports
Enriched Reports is an interactive tool that lets you take a deep dive into library and resource data for your school or district. Preconfigured reports help you track and analyze your library collection, resources, and patrons. Use graphs, tables, and charts to see visual representations such as historical usage, circulations, and total items owned or lost. You can filter, sort, and drill into the information to get data that meets your needs.
| Note: Enriched Reports is only available for Follett Destiny Cloud customers, on the Reports tab. |
For more information, see the Enriched Reports Help Center.
19.3 Updates to Renew All
The Global Renew feature has several updates. In Resource Manager, district-level users have the ability to globally renew resources, and Library Manager users at the district and site can renew all.
District users with either the Manage Library Materials for the District or Manage Resources for the District permission will see the Circulation tab when logged in at the district level. They will be able to perform a global renew for the district's library materials and resources.
| Note: A district user's resource group setting is honored when renewing resources. |
Sites with Library Manager can now perform a global renew. Materials can be limited by material type, circulation type, and patron type, as well as persona, graduation year, and grade level.
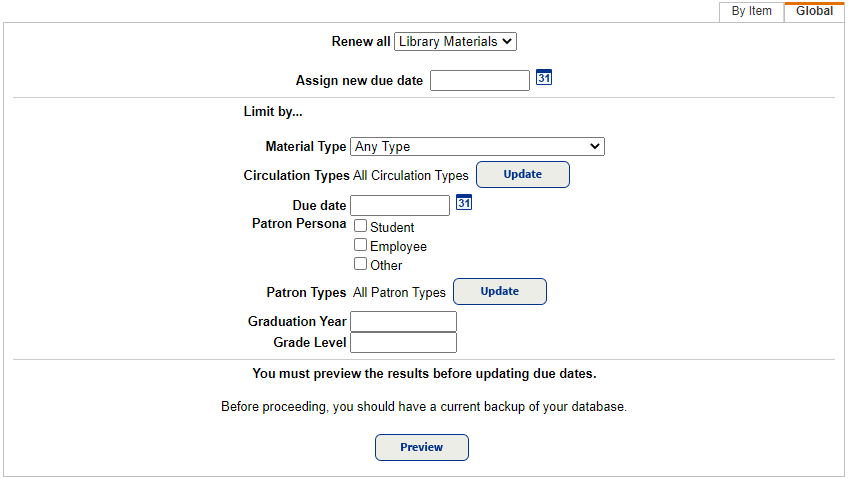
The Patron Persona field is also available when using this feature. In addition, more fields appear on the Job Summary's preview and process complete pages.
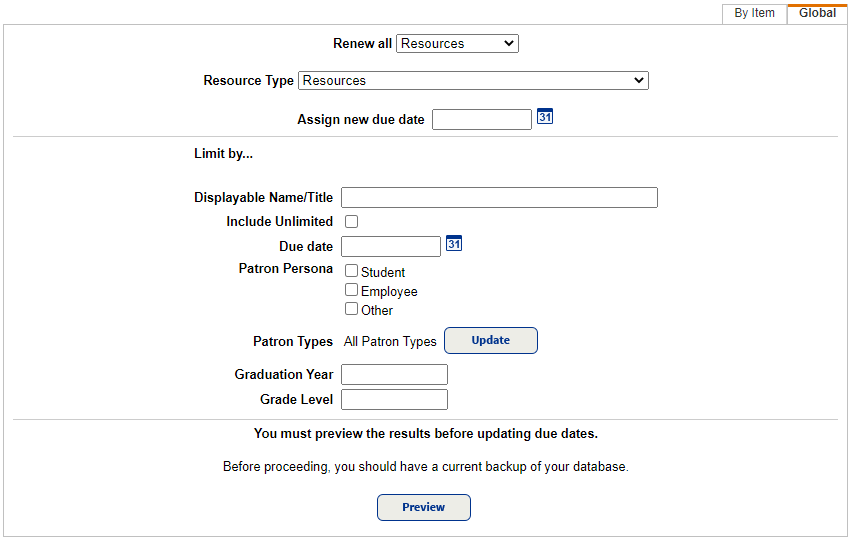
For more information on renewing library materials and resources, see Renew Checkouts.
19.2 Adjust Existing Fines
Sites can now reverse previous payments and waivers against specific fines through the Application Programming Interface (API) system.
View the transaction history of reversed payments and waivers by clicking Details for the fine or by viewing the fine history (Select Circulation > Fines. In the Find Patron field, scan or type a patron name, then click View History). For more information, see View Fine History.
To run a transaction history report, select Reports > Patron Reports. Under Circulation, click Fine History to view the Cash Flow Report.
For more information, see Generate a Fine History Report.
19.2 Purge Patron Records
Destiny now lets you clean up patron records after a FULL and clean patron update is completed. An update is considered clean if the job does not fail, and there are less than 100 skipped records.
When district users schedule a full patron update – whether creating a new one or editing the parameters for an existing one – they can choose to inactivate or delete patron records based on patron type, access level, or persona.
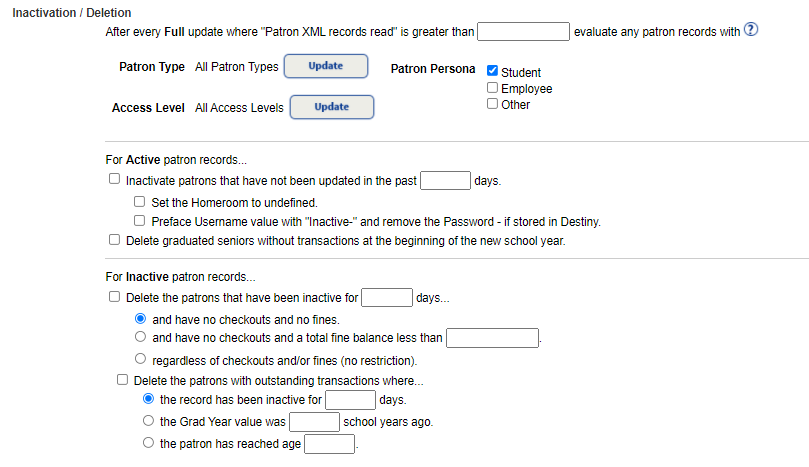
For active patron records, you can choose either or both options:
- Inactivate patron records that have not been updated in a set number of days.
- Delete graduated seniors' records that do not have any transactions at the beginning of the new school year.
For inactive patron records, you can choose either or both options:
- Delete patron records that have been inactive for a set number of days with no checkouts or fines, with no checkouts and a fine balance of less than a specified amount, or regardless of checkouts and fines.
| Note: If you choose 'regardless of checkouts and fines', you are no longer able to delete patron records with outstanding transactions. |
- Delete patron records with outstanding transactions if the record has been inactive for a set number of days, based on a specific graduation year, or the patron is a specific age.
For more information on scheduling patron updates, see Add a Scheduled Patron Update.
19.1 Security Updates
Destiny Back Office version 19.1 continues our commitment to make Destiny Back Office the most secure and stable library and resource management system available. Improvements to the 19.1 product also include upgrades to Follett's web service infrastructure. Contact Technical Support for more information.
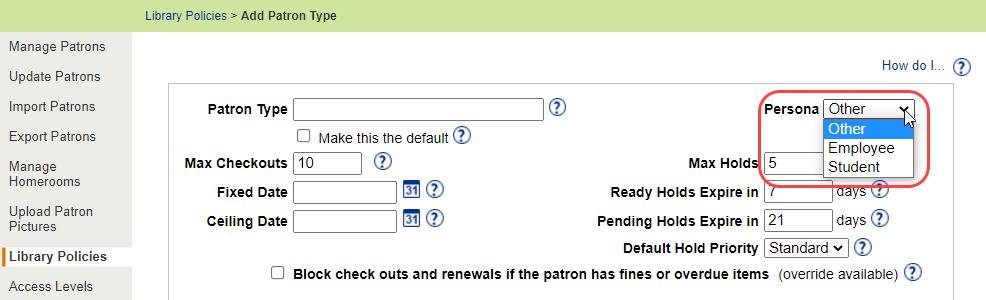
19.0 Persona Added to Patron Type
In Destiny Library Manager and Resource Manager, you can now use a persona to group patrons together. The persona is a patron type setting that lets you define who uses a patron type, like an employee, student, or other user.
| Important: The Persona field must be configured in Admin > Resource Policies > Patron Types sub-tab to create meaningful 1:1 Resource Checkouts and 1:1 Resource Checkouts Percentages reports. The field is also needed for Digital Signature Agreements to work during checkout and to run the Digital Signature reports. |
As a Destiny Administrator, select Setup > District Options sub-tab, and then click Edit next to Patron Types and Library Circulation Types. At the site level, go to Admin > Library Policies (or Resource Policies) > Add Patron Type. Use the drop-down to select the persona you want.
For more information on patron types, see Set Up Patron Types (Library), Resource Policies - Patron Types (Resource Manager), and Add a Patron.
Destiny Library Manager
19.3 Sublocation Updates
Sublocation updates have been made in Library Manager to the Top/Bottom Titles and Removed from Quarantine – Library reports.
Top/Bottom Titles report
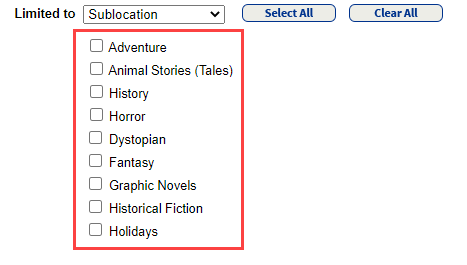
The Top/Bottom Titles report (Reports > Library Reports > Statistics > Top/Bottom Titles) now has a sublocation limiter. You can use the Limited to drop-down, at the bottom of the page, to select Sublocation.
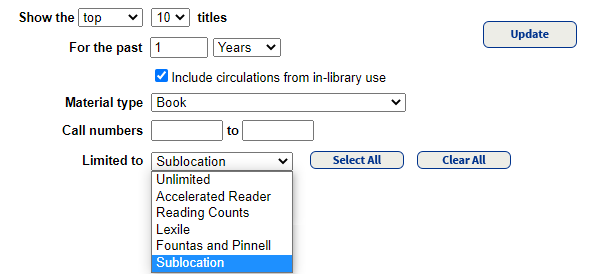
You can then select any or all of the assigned sublocation checkboxes to limit your search.
Click Update. The list of titles appears at the top of the page, with a sublocation value before each call number.

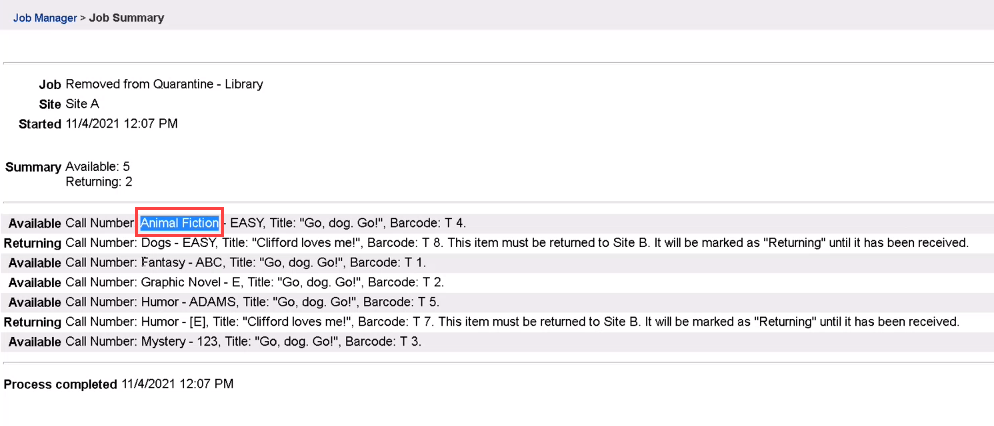
Removed from Quarantine – Library report
Librarians need to know where to put genrefied books when they come off quarantine. The nightly Removed from Quarantine – Library processing job now contains this information. A sublocation value appears before the call number.
|
Note: This job runs automatically if your site or district has on the Edit District page (Setup > Sites sub-tab).
|
For more information, see Top/Bottom Titles Report or Set Up Your District and Schools.
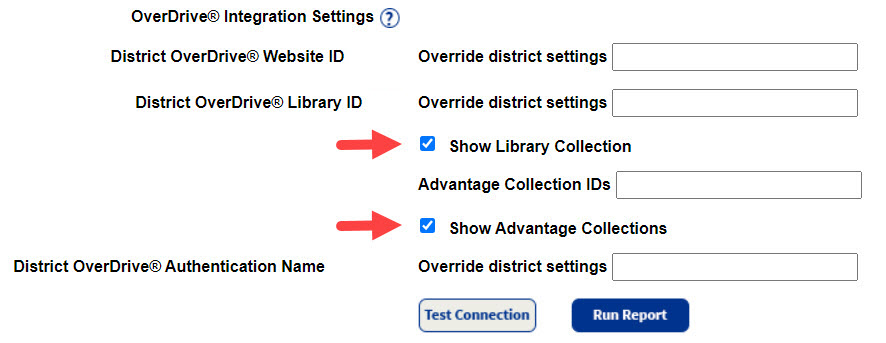
19.0 OverDrive Integration Enhancements
You can now more clearly define the OverDrive® content patrons at your school have access to via Destiny: the OverDrive (district) library collection, OverDrive Advantage collections, both, or neither. Previously, if an OverDrive Advantage account was defined, the library collection was excluded.
These settings are controlled with two new checkboxes in Admin > Site Configuration > Site Info sub-tab: Show Library Collection and Show Advantage Collections.
|
Notes:
-
When you first enable the OverDrive integration for the district, by default, both checkboxes are selected at each site.
-
If you enabled OverDrive integration for the district prior to Destiny v19.0, the checkboxes selected by default depend on a site's settings:
-
If it is set up with Advantage Collection IDs, then Show Advantage Collections is enabled and Show Library Collection is disabled.
-
If it is not set up with Advantage Collection IDs, then Show Library Collection is enabled and Show Advantage Collections is disabled.
|
For more information, see OverDrive Integration Settings (Site) or OverDrive (District).
19.0 Override Holds Chosen by Patron
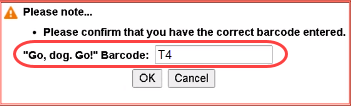
When filling a patron's hold, if you pull a copy from the shelf that is not the one automatically assigned by Destiny, you can now update the hold to use the pulled copy instead.
On the View Requests page (Circulation > Holds/ILL > View Requests), click Pull Copy in the row of the hold you want to override.

A warning pop-up appears. Update the Barcode field to match the pulled copy, and then click OK.
|
Notes:
-
You can only override a patron's hold if there is an available copy.
-
If you attempt to enter a barcode number from a copy that is not available, a warning message appears: The barcode entered was not found on an available copy of this title at this site.
|
For more information, see Manage Hold and ILL Requests.
Destiny Resource Manager
19.3 1:1 Device Reports
Two new reports in Resource Manager give districts and schools information about checkouts for 1:1 devices and other resources.
1:1 Resource Checkouts Report
The 1:1 Resource Checkouts report lets districts and sites see patrons with one of the following:
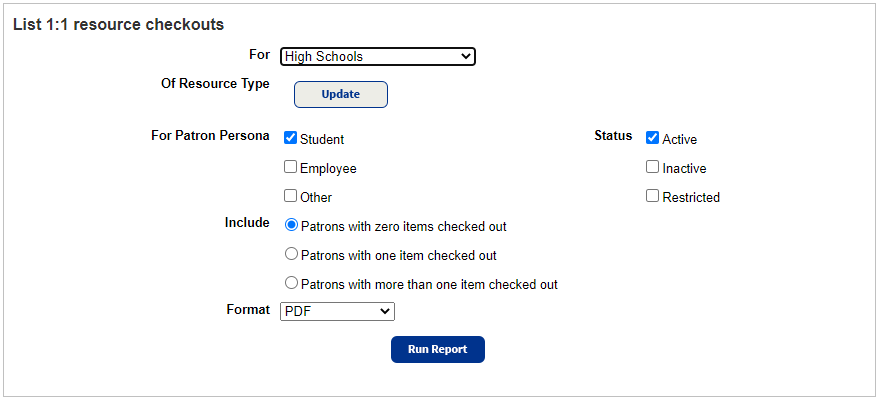
| Note: In Destiny 19.3, if you choose Excel from the Format drop-down, the output will include the patron's district ID and barcode number. |
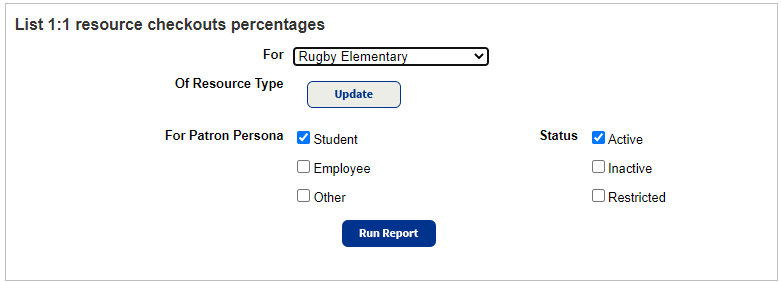
1:1 Resource Checkouts Percentages Report
The 1:1 Resource Checkouts Percentages report lets districts and sites track the number of patrons and percentage of those patrons with at least one checkout.
For more information, see 1:1 Resource Checkouts and 1:1 Resource Checkouts Percentages.
19.1 Digital Signature Agreements
With Destiny Resource Manager's Digital Signature Agreements, districts and schools can let parents, teachers, and students digitally sign acceptable use policies and other agreements required for 1:1 devices and other resources.
After an administrator or user with the Manage resource templates permission creates an agreement, schools can give parents a URL, linking them to a signature form before distribution of resources. Signatures can also be obtained for resources at the time of checkout.
Resource Manager automatically looks for signed agreements during checkout, and provides on-screen notification if a signature is needed. Users with the appropriate permissions can override missing signature block messages during checkout, search for and view signed agreements, and view related reports.
Create an Agreement
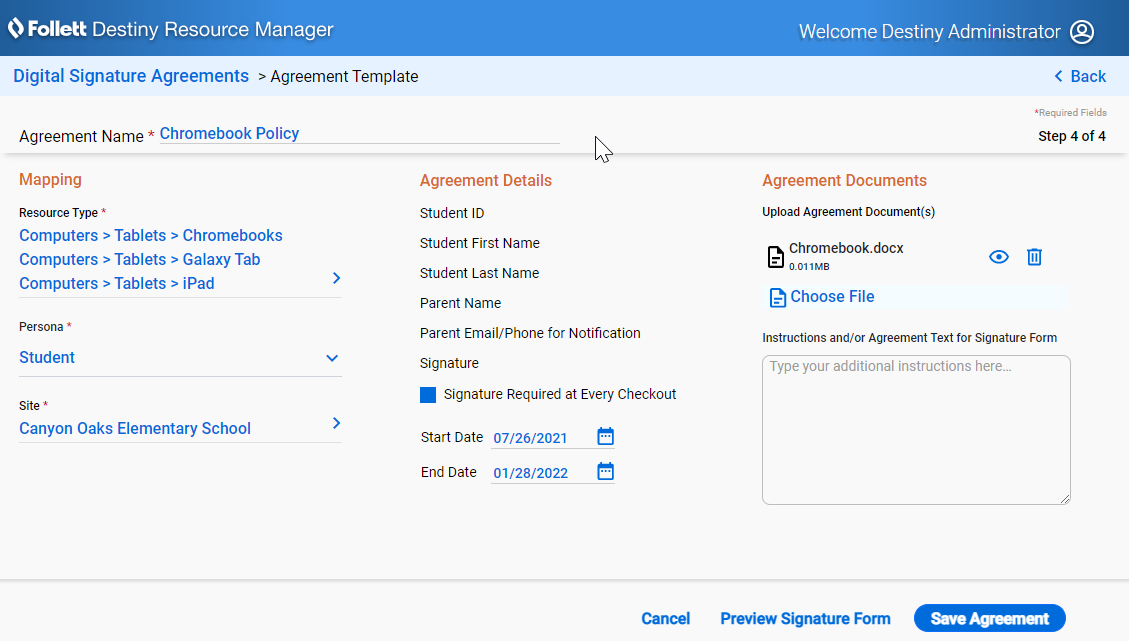
Administrators use a four-step process to create agreements:
-
Step 1: Enter an agreement name.
-
Step 2: Select the Resource Types, Persona, and Sites.
-
Step 3: Decide if a signature is required at every checkout, and the dates the agreement is active.
| Note: If users should sign an agreement every time they check out a particular mapped resource type, regardless of how many times they check out a resource of that type, select the Signature Required at Every Checkout checkbox when you create or edit an agreement. |
The administrator can then preview the agreement or save it.
After the agreement is saved, the administrator can edit (until it has been signed), preview, copy a URL link to the signature form, duplicate, or delete it.
URL Access to the Signature Form
Every time an agreement is created, it is assigned a unique URL. You can distribute the URL to parents and staff to sign the agreement prior to resource distribution.
| Note: The patron's District ID is used in the ID field and is matched with the patron name to verify identity. |
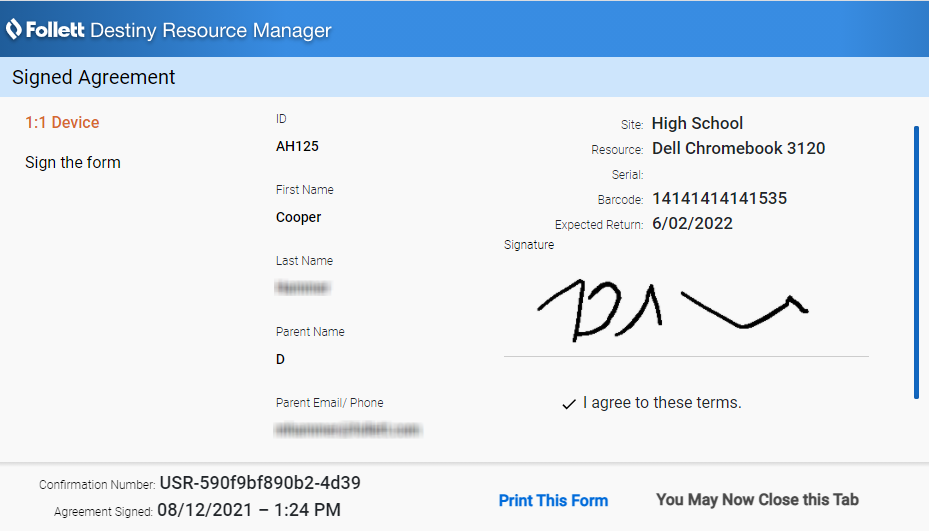
Signature Agreements at Checkout
If an agreement is not signed ahead of time or a signature is required at every checkout, a blocked transaction message appears and signing can be done at the time of checkout.
|
Note: The Persona field must be configured in Admin > Resource Policies > Patron Types sub-tab for Digital Signature Agreements to work during checkout. For example, the persona is set to something other than Student for a student patron type, and the agreement is created for the Student persona. In this scenario, a block message will not appear, and the item will be checked out without a signed agreement.
|
To have the patron or their guardian sign the agreement, click the link under This item requires a signed agreement be on file at the time of check out.
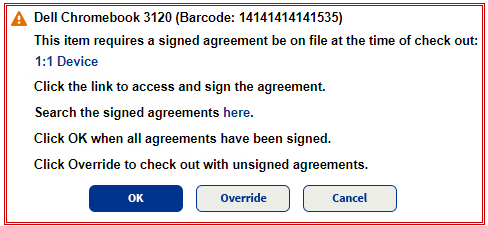
Users with the Override resource blocks permission can override the block.
Digital Signature Reports
Run the Block Overrides report to see items that were checked out without signatures on the associated agreements (block message was overridden).
The Needs Signature report lets you see patron checkouts which are missing digital signatures. If an agreement is signed after checkout, that item will be removed from the report.
Both reports can be downloaded as an Excel spreadsheet.
For more information, see Digital Signature Agreements.
Destiny Discover
Destiny Discover and Digital Enhancements (Fall 2021)
Follett is making exciting changes to Destiny Discover this fall! Watch for the following new features and enhancements:
-
The Search bar is accessible on all pages for Destiny Discover (with advanced search improvements) and Collections by Destiny®.
-
Follett Destiny Discover® Engage, an add-on subscription to Library Manager, takes you beyond traditional reading lists to robust reading programs and challenges.
-
New reports give insight into Destiny Discover usage (For Follett Destiny Cloud customers only. See the Enriched Reports Help Center).
To learn more and stay on top of the latest updates, visit the Destiny Discover What's New page in the Destiny Discover Help Center.
For more information on Destiny Discover Engage, contact your sales representative or visit Follett Learning.
What's New in Destiny Version 19.3 PDF
|